KuBot Google images with Robocorp
This tutorial in a nutshell
In our next example we will build a KuBot that interacts with a user to take a screenshot of a specific image from the results of a Google Images search. This tutorial expands on the knowledge shown in tutorial KuBot desktop screenshot, so if you haven't done it before, we highly recommend that you take a look at that tutorial first. The purposes of this example are the following:
- Interact with the user (you have to click on the image you want the robot to capture)
- Use of Robocorp libraries (robocorp-tasks, robocorp-browser)
- Upload the result to KuFlow using kuflow-pyhton-sdk
Since we will be using the Robocorp libraries, we will use Python as our programming language. However, remember that you can use many other RPA development languages and frameworks, visit the rest of the documentation or contact us if you have questions.
Prerequisites
Before you start you need to create a user in the app if you don't already have one. We must register it in KuFlow (app.kuflow.com). You will also need to have the Organization Administrator role since we are going to carry out administrative actions (definition of a process, definition of a KuBot...). To check this, click on the "settings" menu and see if you have access to the process definition menu.. If you do not see this menu, you probably do not have the necessary permissions to define processes, so you will have to request it from your Organization administrators, or simply create a FREE new account.
It is also recommended that you first read the general details about Kubots development in our documentation.
Source code for our Worker
The source code for this example can be obtained from our python examples repository.
Main technologies used in the example
The requirements to complete this tutorial are as follows:
- Poetry (>=1.4.0)
- For python packaging and dependency management
- Python (>=3.11)
- To build the example. It is distributed in an integrated way so it is not necessary to install it in isolation.
- IDE
- An IDE with good Python support is necessary to work comfortably. You can use VSCode, IntelliJ Idea, Eclipse or any other with corresponding Python plugins.
Dependencies used in the code:
- KuFlow Rest
- Provide a rest client, activities and utilities to work with KuFlow.
- Robocorp tasks
- Provide entrypoints for automations
- Robocorp browser
- Automate actions in a browsers, powered by Playwright
Implementation details
Process workflow
In order to use the KuBot that we will develop, we need to create a process with at least one human task that will assist. We will model a process with a single human task assisted by a Kubot, whose sole purpose is to contain the captured image. The workflow will be a simple sequence: starting the process, performing the task and completing it.
- The user will start the process. The user enters the query to search in Google Images as the required starting metadata.
- The workflow will create a task that will contain a form (data structure) that will present a file, our desktop screenshot.
- The person responsible for this task will be the user initiating the process (human task).
- The user requires the robot's assistance, which triggers a job in KuBot Manager.
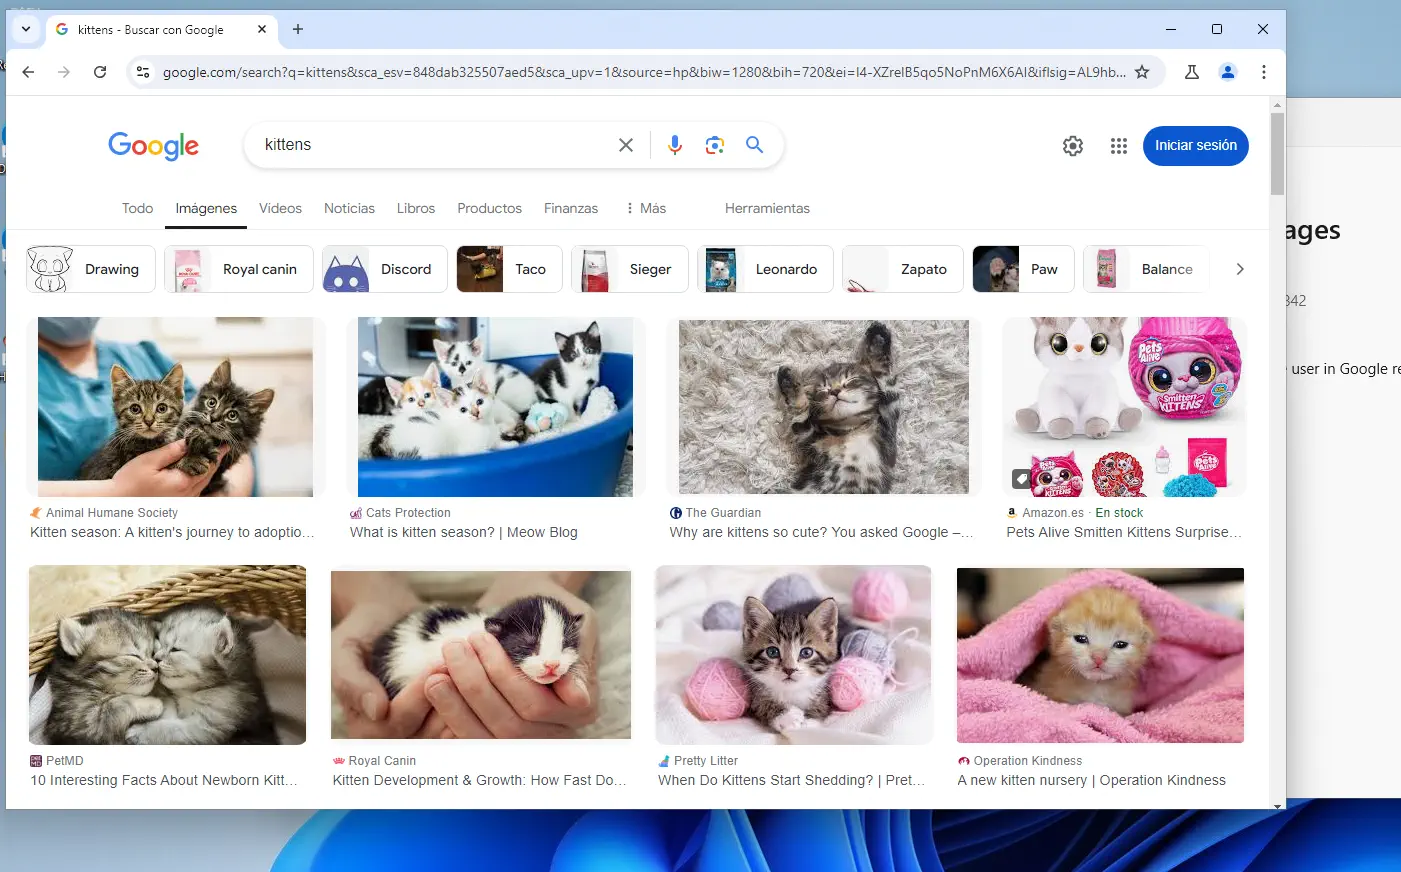
- The robot performs the requested search by opening a browser and waits for the user to click on the desired thumbnail in the results.
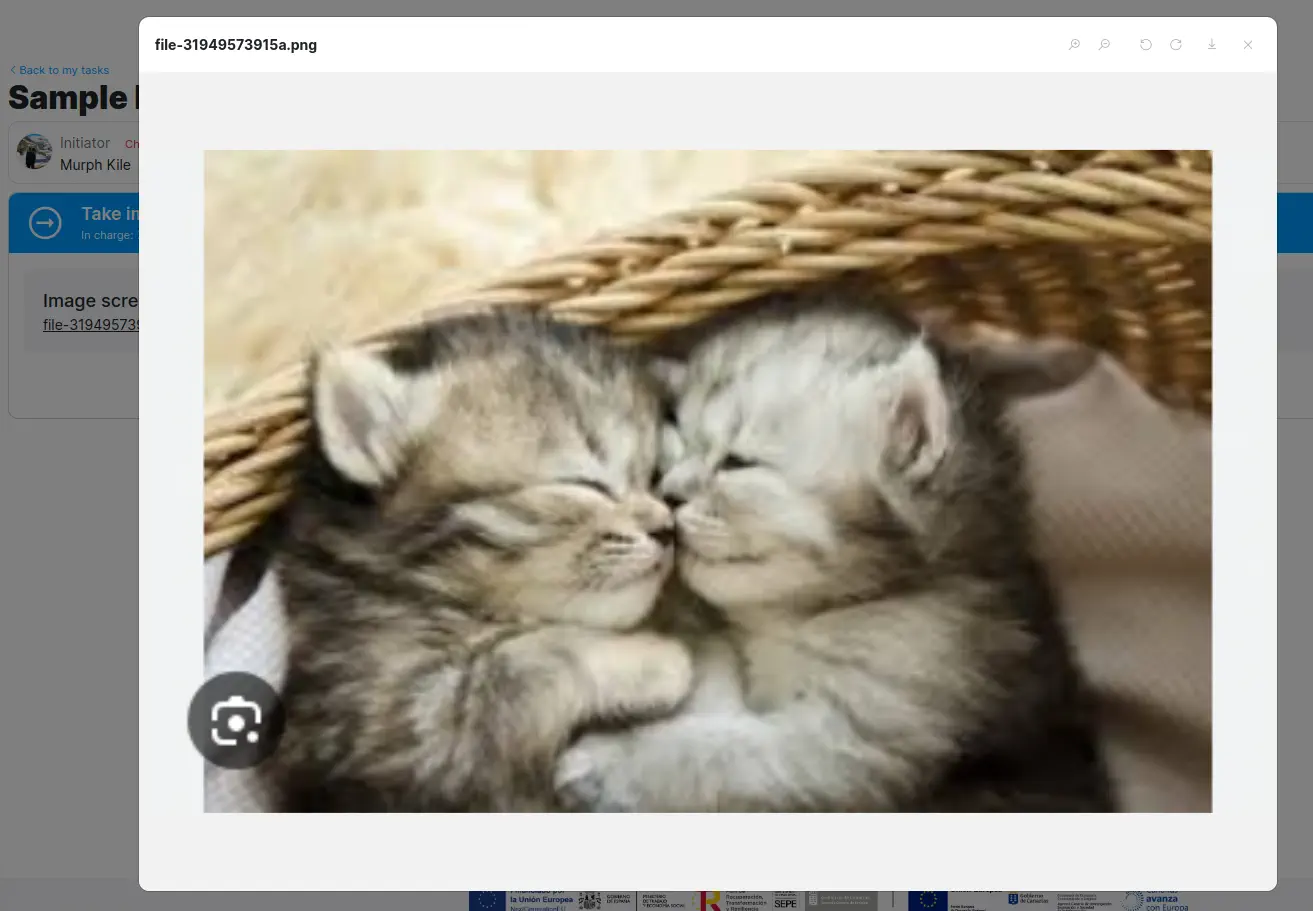
- Immediately after clicking the thumbnail, the robot captures said image and uploads it to KuFlow.
- Finally the user completes the task and the process is completed.
Process settings
-
Name
- Users will locate it in the app by this name.
-
Description
- Free text description about the Workflow.
-
Workflow
-
Workflow Engine
- KuFlow Diagram Tool, we will use the serverless engine for simplicity.
-
Workflow Diagram
- Leave empty for now (first, define the rest of the settings, such as tasks, then come back here)
-
-
Metadata
- Code: SEARCH_TEXT
- Name: Search text
- Field type: Text
- Mandatory: Yes
-
Permissions
- At least, one user or group of users must have the role of
INITIATORin order to instantiate the process through the application. In this tutorial, we will allow all users from this organization to be able to process initiation (Groups > Users) - At least one user must be the
ADMINISTRATORof the process, so we give our KuFlow user the role. Incidentally, we also give you thePROCESS MANAGERrole so that you can manage the instances of this process of other users.
- At least, one user or group of users must have the role of
-
Data structure
-
For now we will create a structure that we will leave empty, throughout the tutorial we will return and complete it.
-
Name: Take image screenshot form
-
Code: STRUCTURE_SCREENSHOT (or any other, we will not use it in this tutorial)
-
Form definition (learn more here):
-
Schema:
{
  "properties": {
    "file": {
      "type": "string",
      "format": "kuflow-file",
      "accept": ".png,.jpg,.jpeg",
      "title": "Screenshot file",
      "readOnly": true
    }
  }
} -
UI Schema:
{
  "type": "Control",
  "scope": "#/properties/file"
} -
Messages: leave the empty object
-
Data: leave the empty object
-
-
-
Tasks
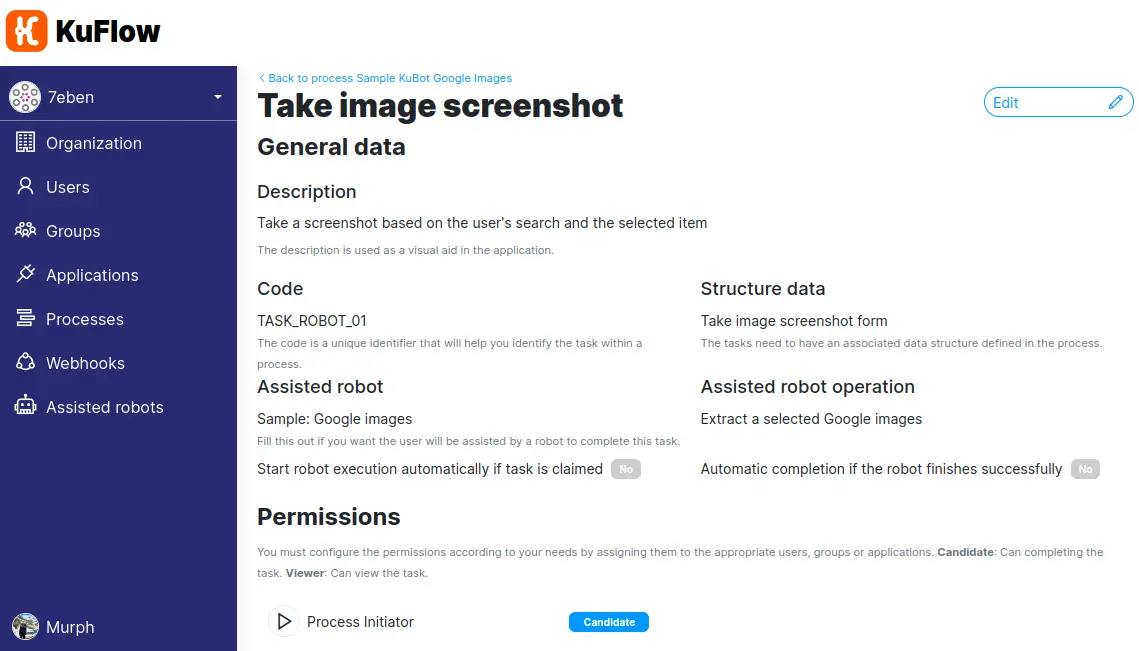
- Task "Take image screenshot"
- Description: Take a screenshot based on the user's search and the selected item
- Code: TASK_ROBOT_01
- Data structure: Set the previous data structure created
- Assisted robot: Leave empty for now
- Permissions:
- Roles > Process Initiator as Candidate (it is a human task that will be performed by the process initiator himself, therefore we select the Process Initiator role)
- Task "Take image screenshot"
At this point, edit the process and open the workflow editor and leave it as follows:
- One "Start" node
- One "Task" node with our task definition. Set
${.initiator.id}expression in Owner input. - One "Stop" node
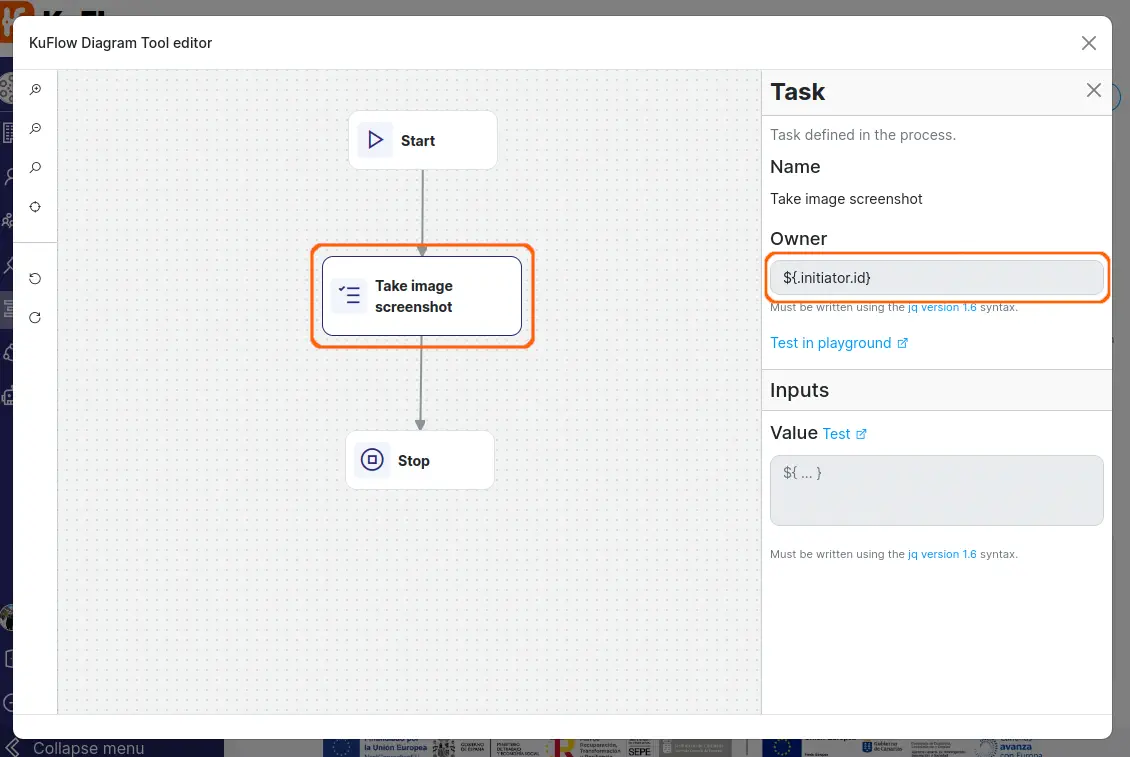
Save the changes.
Save the changes.
KuBot
In this tutorial we will use VSCode in our development. For greater agility, we will clone the example repo and explain the important parts. Of course, you can structure the Python module however you like. We will use Poetry in this example but finally the KuBot package code that we will upload to our platform will only contain a manifest, the code and a "requirements.txt" file with the necessary dependencies. We will not upload our own Poetry files.
- Open a terminal and make sure you have pyhton and poetry available in it.
- Clone the repo: https://github.com/kuflow/kuflow-samples-python
- Move to repo directory and execute
code . - The cloned repository contains different examples, we will focus on the "kuflow-samples-kubot-desktop-screenshot" folder that contains the example of this tutorial. We open a Terminal integrated in VSCode and move to said directory. Make sure that you do not have any virtual env already activated in said terminal since we want to create a new one (test with
poetry env info, If there is no virtual environment activated, the result will indicate that a virtual environment was not found).cd kuflow-samples-kubot-google-images
- Next we are going to build the virtual environment with the dependencies of our project. For this we will use Poetry. Examine the "pyproject.toml" file to get a first look at the module structure and its dependencies. The execute:
poetry install
- Instructs VSCode to use the created virtual env. To do this, we open the command palette and select the Python interpreter that is in the virtual environment that has been built in a hidden directory.
- Open command palette, search "Python: select interpreter"
- Locate and select the python executable in the environment. For example:
kuflow-samples-kubot-google-images/.venv/bin/python
Now we will examine the example code. Open:
kuflow-samples-kubot-google-images/kuflow_samples_kubot_google_images/tasks-google-images.py
First of all, we are using the @setup entrypoint provided by the robocorp-tasks library to initialize some objects for our KuBot. First we create a context defined in kuflow-samples-kubot-google-images/kuflow_samples_kubot_google_images/models.py that will contain the rest client to the KuFlow API and access to robot configuration variables.
In the same way we will initialize the browser with which we will work with Playwright through the robocorp-browsers library. We choose a chromium with a graphical environment since the user will interact in said browser. We recommend using the browser-isolated installation so that it is also local to the KuBot manager installation. Likewise, it is advisable to install the browsers at the time of provisioning the robot (through the kubot.yaml manifest as will be seen later) since this way the user experience is better on the first invocation of the robot.
@setup(scope="session")
def before_all(tasks):
    global ROBOT_CONTEXT
    ROBOT_CONTEXT = RobotContext()

    # Important:
    #   If the robot runs on KuBot Manager, we recommend set "isolated=True" in order to install browsers in
    #   KuBot Manager store (shared for all robots). If you set "isolated=False", the installation is global
    #   to the User.
    #   Additionally, to avoid installing the browsers the first time it is run, it is recommended to add a
    #   Post-Action in the robot manifest (kubot.yaml) that installs the browsers, like:
    #   - name: Install browsers
    #     shell: python -m robocorp.browser install chromium --isolated
    # Hints:
    #   To increase windows size, add param like: viewport_size=(1920, 1080)
    browser.configure(browser_engine="chromium", headless=False, slowmo=100, isolated=True)

    browser.context().set_default_timeout(DEFAULT_TIMEOUT)
    expect.set_options(timeout=60000)
We created code to process the robot execution status and add an error message if necessary. We use @teardown to execute the function after the @task
@teardown(scope="task")
def handle_run_finished(task):
    try:
        if task.failed:
            message = f"<<<<< The robot has terminated with an error. Details: {task.message} >>>>>"
            append_log_message(message, kf_models.LogLevel.ERROR)
        else:
            message = "<<<<< The robot has finished successfully >>>>>"
            append_log_message(message, kf_models.LogLevel.INFO)
    except Exception as e:
        _LOGGER.exception("An error occurred running operation: %s. Details: %s", task.name, e)
In this example we will only define a single entry point in this file, we will annotate it with @task. The name we give to the function will be used later in our manifest.
@task
def run_robot():
    try:
        _LOGGER.info("Robot starts running")
        append_log_message("<<<<< Robot execution begins >>>>>", kf_models.LogLevel.INFO)

        process = get_process()
        text_search = get_text_search(process)
        go_google(text_search)

        _LOGGER.info("Robot job is done")
    except Exception as e:
        _LOGGER.error("Error executing robot", e)
        raise e
    finally:
        browser.context().close()
Finally the code of the use case. the go_google function, opens a browser, accepts the cookie policy, performs the search, waits for the user's selection, takes the image capture and finally uploads it to the task in the KuFlow process.
def go_google(text_search: str) -> str:
    page = browser.page()

    page.goto("https://images.google.com/", wait_until="load")

    page.locator("#L2AGLb > div").click()
    page.locator("textarea").nth(0).fill(text_search)
    page.locator("button.Tg7LZd").click()

    append_log_message("Awaiting user selection.", kf_models.LogLevel.INFO)

    locator = page.locator('div[jsname="figiqf"]')
    locator_count = locator.count()
    locator = page.locator(".p7sI2.PUxBg").nth(locator_count-2)
    expect(locator).to_be_visible()
    path = "output/capture.png"
    locator.screenshot(path=path, type="png")

    append_log_message("Capture done.", kf_models.LogLevel.INFO)

    task_id = os.environ.get(KuFlowEnvironmentVariablesConstants.KUFLOW_TASK_ID.value, None)
    upload_file(task_id, path)


def get_process() -> kf_models.Process:
    process_id = os.environ.get(KuFlowEnvironmentVariablesConstants.KUFLOW_PROCESS_ID.value, None)

    return ROBOT_CONTEXT.kuFLow_client.process.retrieve_process(process_id)


def upload_file(task_id: str, doc_path: str) -> kf_models.TaskSaveJsonFormsValueDocumentResponseCommand:
    command = kf_models.TaskSaveJsonFormsValueDocumentRequestCommand(schema_path="#/properties/file")

    file_name = os.path.basename(doc_path)
    file = open(doc_path, "rb")
    content_type = guess_content_type(doc_path)
    file = kf_models.Document(
        file_mame=file_name,
        content_type=content_type,
        file_content=file,
    )

    value = ROBOT_CONTEXT.kuFLow_client.task.actions_task_save_json_forms_value_document(task_id, file, command).value

    json_model = { 'file': value}
    json_text = json.loads(json.dumps(json_model))

    command_save_json = kf_models.TaskSaveJsonFormsValueDataCommand(data=json_text)

    return ROBOT_CONTEXT.kuFLow_client.task.actions_task_save_json_forms_value_data(id=task_id, command=command_save_json)


def get_text_search(process: kf_models.Process) -> str:
    return ProcessUtils.get_element_value_as_str(process, RobotConstants.PROCESS_METADATA__SEARCH_TEXT.value)


def append_log_message(message: str, level: kf_models.LogLevel) -> kf_models.Task:
    task_id = os.environ.get(KuFlowEnvironmentVariablesConstants.KUFLOW_TASK_ID.value, None)
    log = kf_models.Log(message=message, level=level)

    return ROBOT_CONTEXT.kuFLow_client.task.actions_task_append_log(task_id, log)

def guess_content_type(file_path):
    return mimetypes.guess_type(file_path)[0]
Building the KuBot package
Now that we have a valid code, we will build the zip package that we will upload to KuFlow. To do this, we will first obtain a requirements.txt file that describes the necessary dependencies in the project. To do this we will execute:
poetry export --without-hashes --format=requirements.txt > requirements.txt

# NOTE: In future versions of Poetry you must first install the export plugin:
# $POETRY_HOME/bin/pip install --user poetry-plugin-export
The next step is to take a look at our manifest, we provide a kubot.yaml file with the following content.
#
# kubot.yaml manifest
#

operations:
  - name: Extract a selected Google images
    shell: python -m robocorp.tasks run kuflow_samples_kubot_google_images/tasks-google-images.py --output-dir ${KUFLOW_EXECUTION_OUTDIR} -t run_robot

tools:
  python: 3.11.4

post-install:
  - name: Install dependencies
    shell: pip install -r requirements.txt

  - name: Install browsers
    shell: python -m robocorp.browser install chromium --isolated
You can see how we specify the run command for our robot using the robocorp-tasks module and specifying the task to run (run_robot), which is the name of our input method.
Next we create the zip:
# Create a zip with the following structure
# ZIP_ROOT:
#	./rpa_estur
#	./requirements.txt
#	./kubot.yaml
zip -r kubot.zip kuflow_samples_kubot_google_images requirements.txt kubot.yaml
Upload the KuBot package
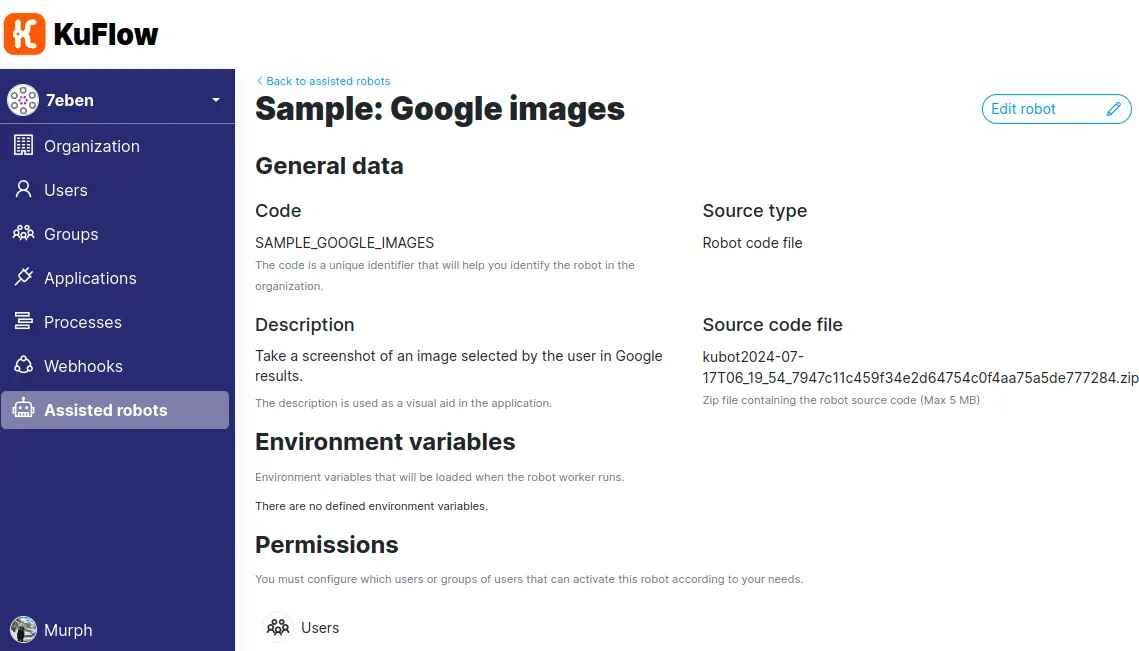
You can check the application reference to know how to do it. For our example you only need to create an assisted robot, upload the package and give it a name and a code.
- Name: Sample: Google images
- Description: Take a screenshot of an image selected by the user in Google results.
- Code: SAMPLE_GOOGLE_IMAGES
- Source type: Robot code file
- Source code file: our package
- Permissions: Groups > Users (available for all users in our organization)
Attach the robot to a task
We will return to the definition of our process, select the task and edit it.
- Assisted robot: We select "Sample: Google images"
- Assisted robot operation: We select "Extract a selected Google images"
We save and publish the changes, so they are available for instantiation.
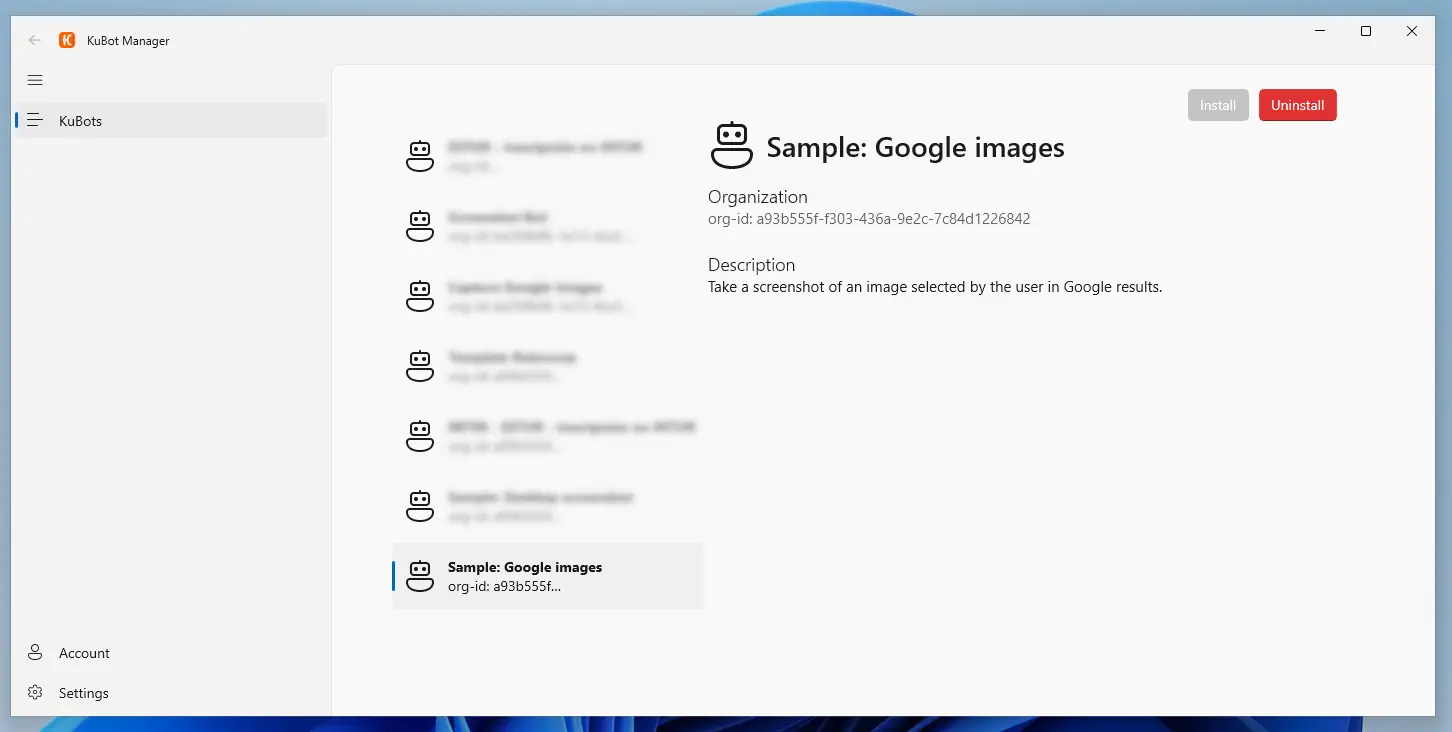
Install the KuBot in the client
We will open the KuBot Manager desktop application, log in with our KuFlow credentials and our robot should appear. We will click on install and wait a few minutes until the installation is complete. Once completed we are ready to receive jobs. If you close the application by pressing "X" the application will be minimized to your task tray so that you can continue going about your normal workday while listening to jobs for the robot.
Test the KuBot
We are ready to test our robot by instantiating it in a task of our business process. To do this, we instantiate our process in the KuFlow cloud app.
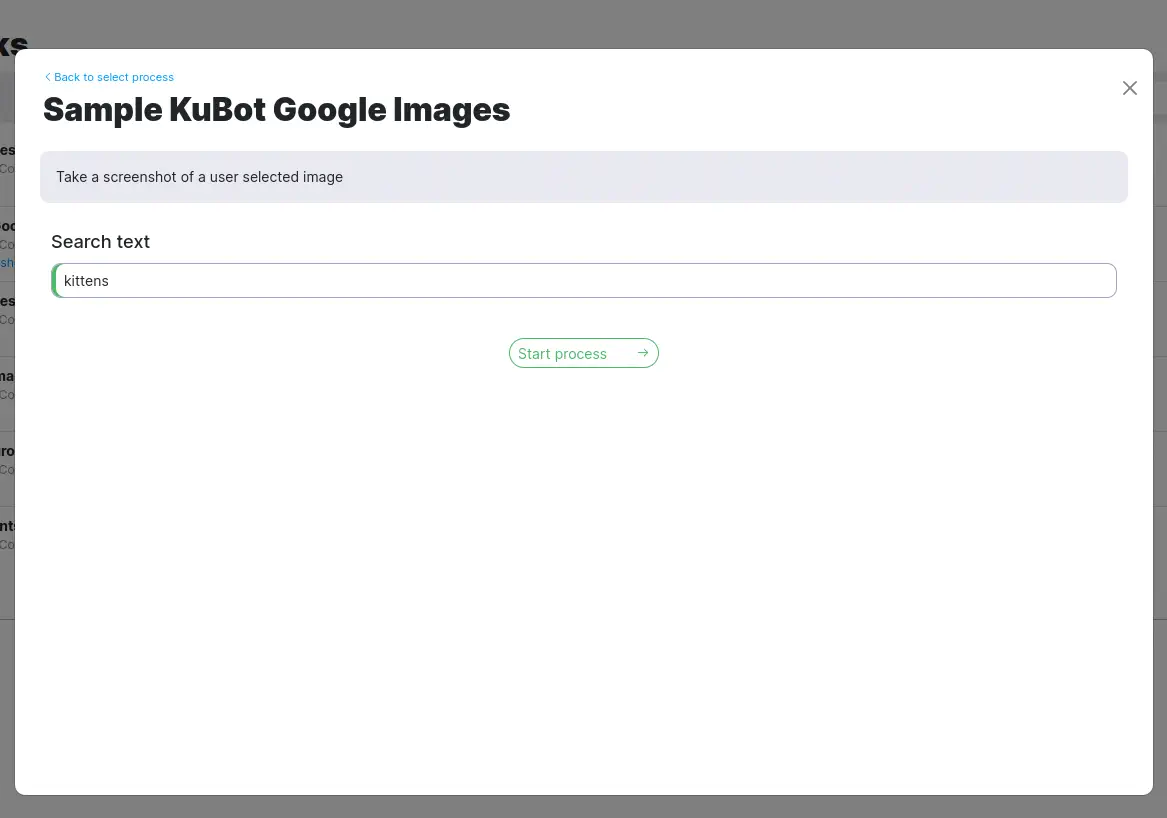
Next, a human assisted task will be created for us:
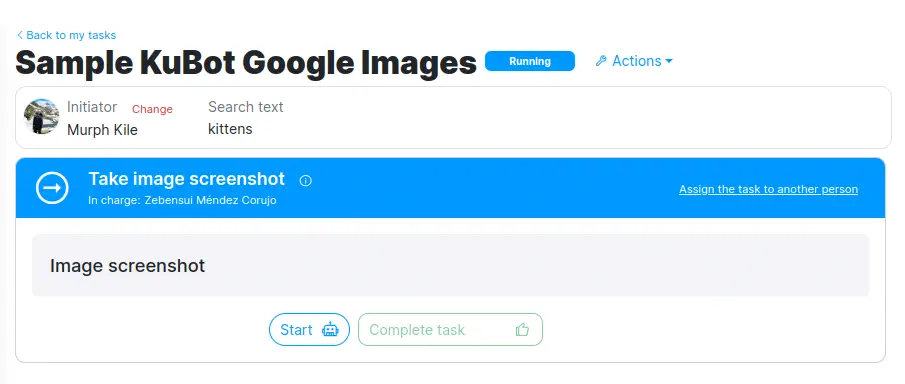
Clicking on "Start" will launch the job request that KuBot Manager will listen to and perform the job. A browser window will open and we will have to select by clicking on one of the thumbnails.
If everything has gone correctly, we enable the "Complete task" button, we complete and finish our process.
Congratulations! You have already developed your first KuBot.
